Denial of Service (DoS) and Distributed Denial of Service (DDoS) attacks are one of the most common attacks that website has to deal with it. I said these are common attack because even those who have mid level sense of programming can bring down a server by repeatedly calling a web service which does expensive work.
Writing such script that repeatedly calling a website/web service is not that hard.
for( int i = 0; i < 100000; i ++ )
{
    WebClient client = new WebClient();
    client.DownloadString("http://www.YourTargetSite.com");
}
So, you can see only 2 lines of code with a for loop can make your server go mad.
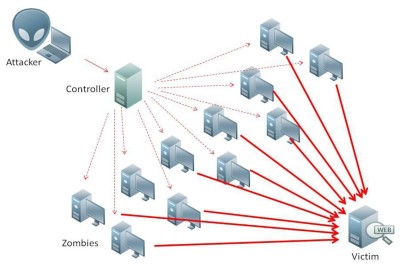
DDoS attack
One thing you could do to prevent such scripts is to use the solution provided by IIS 7.0 knows as Dynamic IP Restrictions (DIPR) module. Its not a solution which would ensure that your site would never gonna hacked, but it helps raise the bar. It provides protection against DOS and brute force attacks on web servers and web sites. What this module does is that it temporarily blocks IP addresses of HTTP clients that make an unusually high number of concurrent requests or that make a large number of requests over small period of time.
At a glance :
Dynamic IP Restrictions (DIPR) key features:
- Blocking of IP addresses based on number of concurrent requests – If an HTTP client exceeds the number of concurrent requests allowed, that client’s IP address gets temporarily blocked.
- Blocking of IP address based on number of requests over a period of time – If an HTTP client exceeds the number of requests made over a specified time interval, that client’s IP address gets temporarily blocked.
- Various deny actions – Specify which response to return to an HTTP client for which the IP address is blocked.
To get this service in Azure Website you don’t need any third party plugin or module installation on your part. All you need is to configure some change on web.config file of your site.
1. Code snippet to to handle concurrent requests:
<system.webServer>
   <security>
      <dynamicIpSecurity>
         <denyByConcurrentRequests enabled="true" maxConcurrentRequests="10"/>
      </dynamicIpSecurity>
   </security>
</system.webServer>
Set the enabled property of denyByConcurrentRequests (under dynamicIpSecurity node) to true. When a client exceeds the concurrent requests their IP will be blocked temporary for further request for a short period of time.
2. Code snippet to to handle maxRequests within a specified time frame:
<system.webServer>
   <security>
      <dynamicIpSecurity>
         <denyByRequestRate enabled="true" maxRequests="15" requestIntervalInMilliseconds="5000"/>
      </dynamicIpSecurity>
   </security>
</system.webServer>
Set the enabled property of denyByRequestRate (under dynamicIpSecurity node) to true. The property maxRequests determines the number of requests a given client IP address may send to your site and requestIntervalInMilliseconds determines the timeframe. IIS will automatically start blocking requests from IP addresses when client exceeds your specified rule. So according the value that I set here in code snippet client making more than 15 requests within a 5 second period will be blocked temporarily.
Setting the rate for the maxRequests and requestIntervalInMilliseconds is bit tricky as you need to balance security over functionality. If your site was particularly popular with one company who uses a proxy appliance to route their internet traffic then you are expecting high volume of connections coming from a single public IP address which actually indicates you need to raise your limits. Again rising this limit means you are allowing potential attackers to play with your site.
Heads Up:
The system.webServer node will already exist in your web.config file and there is a chance that the security node may exist already too so check for these and add appropriate lines in the correct place otherwise you risk bringing your site crashing down due to a bad configuration file.
3. Change the restriction code
By default, DIPR returns Forbidden (HTTP status code 403) when a client breaches the threshold given, however you can customize this. You can return any of the following values :
- AbortRequest (returns an HTTP status code of 0)
- Unauthorized (returns an HTTP status code of 401)
- Forbidden (returns an HTTP status code of 403)
- NotFound (returns an HTTP status code of 404)
In order to change the restriction code return by DIPR amend denyAction parameter in dyanmicIpSecurity node with any of the allowed option discussed above.
Here is the full code snippet :
<system.webServer>
   <security>
      <dynamicIpSecurity denyAction="Unauthorized">
         <denyByConcurrentRequests enabled="true" maxConcurrentRequests="10"/>
      </dynamicIpSecurity>
   </security>
</system.webServer>
How long an IP will remain block?
After DIPR blocks an IP address, the address stays blocked until the end of the current time window. For example, if requestIntervalInMilliseconds is set to 5000 (5 seconds), and an IP address is blocked at the 2 second mark – the address will remain blocked for another 3 seconds which is the time remaining in the current time window.
Good Read:
